
Kia Ora Whanau
Well as promised on my podcast, “Get A Job And Get Healthy With Costas Enterprises” (opens in Spotify). I promised that I would try write a blog as well every week.
Last week I did a review on Redbubble so I thought that I should now cover off the other Print On Demand (POD) service that I regularly use – TeeSpring.
To check out my TeeSpring site you can visit this here.
With my last post, “Passive Income – Redbubble Review … Wait I Got A Sale??” I compared all three POD’s I use, Threadless, TeeSpring and Redbubble. I covered off most of the differences but as I have been using TeeSpring a little longer than Redbubble I will try focus more on this.
So up front I want to say that I actually like a lot of things about TeeSpring, but there are defiantly some things that can hurt this POD.

Pros
- Analytics
So one of the things I really like about TeeSpring is the Analytics section of your dashboard.
The reason this is so good on TeeSpring is they clearly show you how many views/ sales and also what is generating your views. I will include a screen shot of my current analytics views page so you can see.

As you can seem TeeSpring gives you a quick glance graph of views or sales to your store. You can also view your listings (your designs) and sort these by views, orders, units or profit. For the above example I have highlighted my most views for the last month dated to 22 August – 22 September.

The main reason I love the analytics that TeeSpring provide is I can start to see what is working and what isn’t for my designs. It is also where you can see if your have gained a trust score.
… Um what trust score??? and … what is a trust score???
Ok so if this is the first time your hearing about a trust score then that means you haven’t read my previous post or listened to my podcast. Let me explain now.
TeeSpring advises that they will do advertising for you once you gain a positive trust score.
You can’t obtain a trust score until you have made between 1 – 25 sales through TeeSpring.
People don’t realize how important getting your trust score is. If you want to generate income passively using TeeSpring you need your trust score to be positive so your designs are seen by everyone. Now TeeSpring do advise you that you need a trust score when you sign up.
What TeeSpring doesn’t tell you is when you have gained a positive trust score or exactly how many sales you need to generate to get a positive trust score. By using the analytics to your advantage, you can start to see things like sales or views on your site to see when TeeSpring is advertising your designs.
2. Changing your storefront
Ok this Pro is more of a slightly better cosmetic fix then any actual issue on storefront but once you know about it – it can really help.
With Threadless – there is very little storefront customization for your products.
Redbubble is the same but their algorithm at least has the ability to explore designs and then click on products related to the design.
TeeSpring … not so much
Ok so let me clarify what I mean here, if you upload a design to your TeeSpring store then the design is automatically added to your store front. This means that if you don’t customize your storefront you run the risk of having 15 products with all the same design one after the other – this means your customer is only going to see one design until they keep scrolling.
However TeeSpring does allow you to actually fix this. When you are in your dashboard you will notice a “Storefronts” option – From this section you can edit your current storefront and then favorite your designs (and products) you want to be displayed first.
Tip: Hover over the storefront to either view storefront or (located in the top right corner of the storefront thumbnail) you will see a edit button – this is where you can change your actual storefront, edit the banner, add images etc..
Being able to change your storefront does make your POD store feel a bit more personal. I have been very basic with mine but I plan to add a new banner up the top with some of my designs to really make it more vibrant.
3. Uploading preview window
So with this section I am going to cover off the actual upload process and use a new design “Footlong Hugs” created for this blog to show what needs to be done. The reason I really like this is the User Interface (UI) is quite easy to use for those just starting out.
The process of uploading a design, or even adding text to your design is simple and so is the adjusting of the design. While it is a slower process then Redbubble or Threadless it does flow a lot better and is easier to use.

The Upload Process
- Upload your design by clicking the ‘Add Image’. This must be a transparent image. I use a design 5000 x 5000 pixels created in Canva.
- In the preview window you will see your design. You can faintly see a red dotted box. This is the area where your image can be printed on. You can resize the image within this box.
- To see your design on a product click the ‘Preview’ or to go back and edit click ‘Design’.
- Set your colours by clicking the ‘+’ to add more. The colour you select will be the default view. You can change this underneath
- Set your price – as mentioned in my previous post – TeeSpring will set your price initially and it will be quite high – I have changed my price to be lower than what TeeSpring offers meaning my profit will be lower … but this is because I want to generate more sales in the future to build my trust score up.
- Click ‘Continue’
- You will be taken to a new screen where you can select and edit other products for your design

Now you repeat steps 2 – 6 for each product you add.
Once finished click ‘Continue’ to go to the publish page.
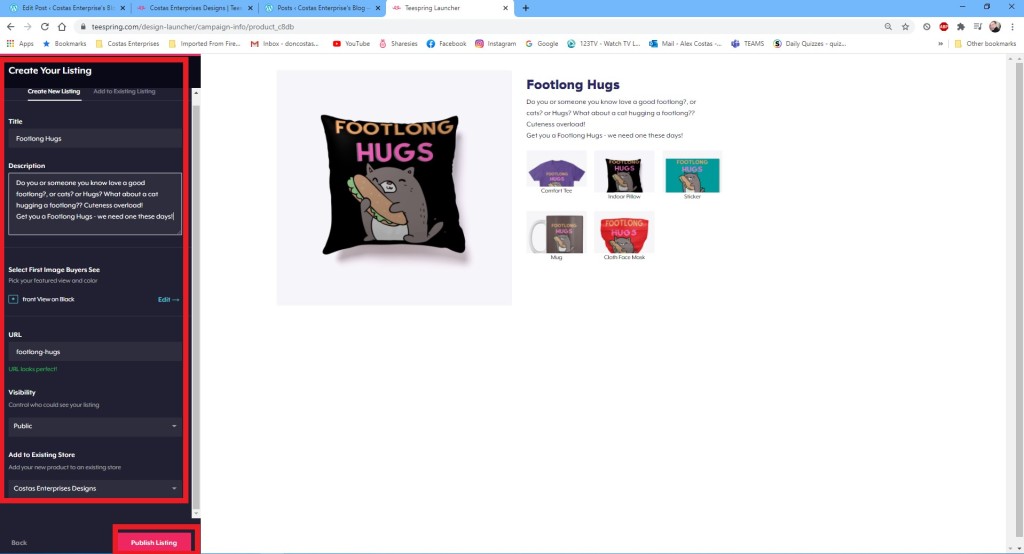
- Add your Title.
- Add the Description for your design.
TIP: Make sure your Description matches your title and mentions the title – this will help TeeSpring find your design and also improve your trust score. - Check the View, URL, Visibility and that it is adding it to our existing store.
- Click ‘Publish Listing’.
- You listing will now be added to the shop.

To view (or purchase … yes cheeky to ask but no harm in asking) this design click here.
Cons
Ok so there are some cons and most I have previously talked about on my podcast and previous post but lets go through them.
- TeeSpring Trust Score
So why is a trust score a Con? well it is a bit of a Catch 22 – It is nice once you have a Trust Score but the negative is that unless you generate “organic” sales. An organic sale is where someone (not yourself) goes to your site and purchase something.
The other problem with this is you have to have 1 – 25 sales. this means there is no actual clear definition of how to obtain a trust score.
TIP: Ok so this Tip might sounds a bit silly but the way I got a positive trust score was simply making three purchases from different accounts (well I made two, my partner surprised me by making a separate one). The only problem with this tip is – it costs you $$ and you may have to get 25 sales before it works
2. Default Pricing
The default pricing set by TeeSpring is way to high. That is not to say that the products are priced too high, I am referring to the default profit price. If you are trying to acquire a trust score as per the first Con you might have a hard time selling the product given the T-Shirt you are trying to sell is close to $30 USD instead of $16 USD as TeeSpring wants to make you money.
But wait? Isn’t more profit what I want? – well yes it is but when your starting up you need to build your brand. You will have to do all of the advertising for your products/ shop with no help from TeeSpring. If you lower the pricing to start with you are more likely to bring in a bigger audience and even if they buy a sticker, this is still a sale. Your customer doesn’t want to be paying $9 USD for something you would usually pay $3 – $5 Maximum.
3. No Tags
So I know I keep referring to my previous post so you may want to check it out.
Tags is something you really need to know about. Tags are the way Redbubble directs your customers to your designs. Tags are like when you tag someone on Facebook or Instagram. You may have even found this post due to a tag!
TeeSpring doesn’t have Tags. Your design will only be found by using keywords in your Title and Description. These are important but as you can guess your visibility will not be as good as it would be with Tags.
Now this is not to say that your design wont be seen by people – TeeSpring still has an audience of close to 28 million views a week, but it means that your keywords in your Title and Description are even more important.
Conclusion
I still really like and use TeeSpring and would recommend people use TeeSpring as well as Redbubble. You will see positives and negatives in both but still the audience is too big to not take advantage of another POD site.
Thanks for sticking with me until the end of the blog post. It has been a long one I know but I hope this has helped you.
If you have any questions please feel free to contact me as I love to here from my community 🙂
Have a great day whanau and good luck!

This is a great tip particularly to those new
to the blogosphere. Brief but very accurate information… Appreciate your sharing this one.
A must read article! dildok3 (Alexandria)
LikeLike
This is a great tip particularly to those new to the blogosphere.
Brief but very accurate information… Appreciate your sharing this one.
A must read article! dildok3 (Alexandria)
LikeLike
Thanks for this dildok3! I appreciate your comment 🙂 Hope you enjoy some of my other posts on Print On Demand 🙂
LikeLike